Thursday, 27 September 2018

Valentine madley roses Canvas


Hello All my crafty friends,


I am Sabiha Khan with a 
 short tutorial on making different textured backgrounds on a canvas without using Stencils.

I have  used the canvas to make a beautiful mixed media project with Valentine Medley Roses from Expressions craft.

Without wasteing much time have a look at my Beautiful project....


Hope u guys loved it, and yeah.....I have a tutorial too.

My VIDEO TUTORIAL..


Hope u loved watching the video and the link to buy the products  used is given below....

Few more pics for u.....


I would love to enter my project in the following challenge...


When I saw the colour theme I was super exited to participate..
As the theme is Mistakes are good, I would say mistakes only teaches u to be a better person. If we love our mistakes we can be always happy...

As it says in my project ....Love is grand....be happy.

Click HERE To play along.


Don't forget to be awesome...If u liked my project leave some love below in comments.

Love,


Products used

Handmade flowers


flowers for decoration online


Gesso and Texture paste
Art Essential

Fairy dusts


Deco stones


art stones
IMMIX Sprinkle mists
Sprinkle Mist


Vintage style Kitchen wall decor


Hello crafty friend,


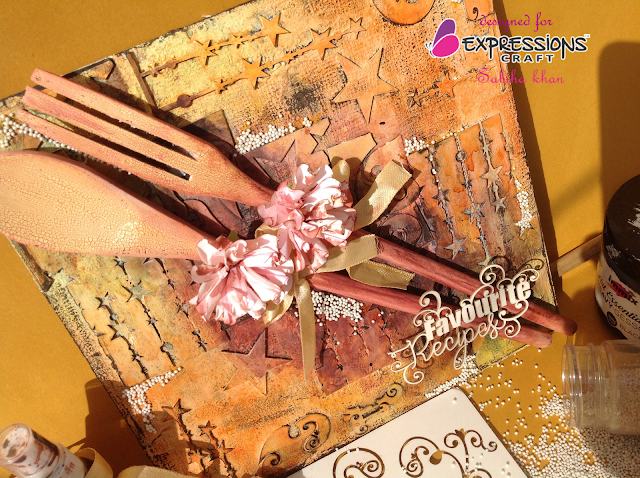
I am Sabiha Khan back with a Vintage style mixed media Wall decor for your Kitchen...
I have used some discarded chipboards and wodden spoons for my project.

Lets have a look at my wall decor first...


I have used all newly launched Expressions craft Mixed Media products under the brand name IMMIX.

I would like to share few more close ups of my project...


One step at a time-

1. I took a MDF base for my project.

2. Applied IMMIX heavy black gesso and let it dry.Then took some texture paste and crackle texture paste from IMMIX Expressions craft and applied randomly over my board.

3. When the texture paste was wet  pressed some jute cloth over it to add texture . You get a fine jute texture on the board.Now let it dry.
4.Took some chippie negatives which were left behind after using the chippies. Cut them into small pieces and adhered them on the board. I have also added some star dangler chippies and few stars too.
5.After I was satisfied with the layout, covered all chippies with heavy black gesso too.

6.After it was dry. Applied IMMIX heavy white gesso all over my layout.

7. Took two wooden spoons and applied black and white gesso too.

8. After the spoons were dry applied some IMMIX crackle paste over them, as you can see in the pics. Coloured the spoons with Sprinkle mists Burnt orange and Chest Nut.

9. I have used three IMMIX Sprinkle Mists to colour my project.
Citrus yellow
Chest Nut
Burnt Orange

10. After I was satisfied with the colours applied some black paint on the edges and randomly all over the textures with my finger to highlight the textures.

11. Finally adhered the spoons on the board and decorated it with Expressions craft sentiment chippie "Favourite Recipes" Few Expressions craft botanical melange shimmer flowers and some satin ribbon bows.

12. And yes, I think the project is never complete without some Deco stones ,I have used mini stones here, a favourite product of all the crafters.

Hope u loved to read my post...

Thanks for visiting, please comment below if liked my project and post.

Love ,


List of products used 


Deco stones Mini


Sprinkle Mists


Crackle texture paste


Art essential heavy Gesso


Chipboard embellishments


shimmer floral


Botanical Melange shimmer floral


Wednesday, 1 August 2018

Hi dear crafty friends,

 I am Sabiha khan here with few interactive cards using stencils from Expressions craft.

First have a look at all the three cards...

U can see the stencils by expressions craft give such good results with all different styles and mediums


Here I have used three different interactive techniques with three different stencils in my cards.

Lets begin with the first card "happy birthday" card.


I have used Checkers and Cubes stencil to make the background with three different distress inks.I would like to mention that I have used Expressions craft ink blending tool in all my cards. It is very good quality and easy to use with beautiful results too.
My card is a slider pop up card. The middle panel of the card slides up to show the message inside as u can see in the picture above.
The bear image and sentiment are from Happy bear stamp set from Expressions craft.

My second card is an Easel card "Just for you"


For this card, I have used Sunflower Stencil for the background.
First I applied texture white on a watercolour card stock with the help of stencil. before the texture dried sprinkled some blue fine shimmer on the texture.After it dried applied some distress oxides on the above corners and embellished my card with some hand made flowers(using expressions craft blue card stock)and die cut leaves.
Embellished the inner card with some stone lace and a sentiment from "Wild flower" stamp set.

My third card is a "Best wishes" shaker card


For this card I have used Vintage style stencil. I have created a rainbow background with distress oxide inks and ink blended them with Expressions craft ink blending tool.
In this card I have used Mini Art Stones from expressions craft too.
I coloured few stones using Burnt Orange Sprinkle mists. Used them with uncoloured stones after drying as my shaker material.
Don't u feel that these art stones are great for any shaker card. u an colour them with different colours too.

Hope u guys enjoyed my post.

Checkers and Cubes stencil


Sunflower Stencil


Vintage Style


Happy bear stamp set


Ink Blending tool


Love 
Sabiha


Saturday, 30 June 2018

Wonderful birthday wishes with checkered florals

Hi Friends,

I just came to know about a new blog challenge by some super talented crafty friends and was eager to participate.

As I am running out of time because today is last day to participate, I won't write a long post.

Have a look at what I tried for "checkered floral" the Theme of this months "the twised challenge"challenge. 


I have made the checkered background on a plane watercolour paper using a chevron stencil from MFT. This checkered background I had alreday made for a card and out of the left paper I made the flowers. Stamped the floral image as well as leaves with archival jet black ink and fussy cut the images.
As u can see I have created a frame window in the middle of the card and used a embossed border to give it an enhanced look.
adhered the floral and leaves in the middle and stamped the sentiment in the middle of inside of the card.
Finally I added some glitter with wink of stella pen on flowers. It is clearly visible in my close up images.

Few more close ups ....


Hope u like my attempt...

Love,

The link to the twisted challenge is HERE

Also entering my card for Less is more challenge (I have used left over bits of checkered paper for flowers)

Play along HERE


And, also entering my card for AAAcards challenge( used a frame)

Play along HERE


Wednesday, 13 June 2018

Shadow box card


Hi friends,

Hope you all are enjoying crafting.


I am Sabiha again this week with my new inspiration post, Its a SHADOW BOX CARD..... made using Expressions crafts beautiful "HOT AIR BALLOON STAMP SET"

When I recently saw a shadow box card video by talented crafter "Jennifer Mcguire" I was sure that I am going to make one such card and the very next thought was stamp set by Expressions craft.
I would like to add here that I got equally inspired by Paru Mahtani who shared so many lovely shadow box cards on IG.This card is also a Masuline card made for Fathers day.

This stamp set was just perfect to make this card and I am proud to use such best quality Indian brand stamps...

Lets first have a look at my card ....


Hope u all guys like my card and now it must be clear how a shadow box card looks.

I stamped few balloon and cloud images from the stamp set on a smooth water colour card stock coloured and fussy cut them.
Took a 8 1/2 by 11 1/2 card stock for the card. Cut two pieces to make 5 1/4 by 8 1/2 size two card stocks. One serves the base card and another for the box.
I took one extra card stock little smaller than the inner half to make the skyline background.
For the front cover I made clouds using a hand cut stencil from acetate sheet and adhered the Balloon and clouds to make a scene.
Added the sentiment using archival black ink.
For the inner box card I made the box, adhered it to the card and before that adhered the background skyline stencilled image to give the depth to the card.
As you can see I have adhered the coloured balloons on the box as well as inside the card.
The scene was ready in no time and it looks so beautiful.
As I wanted to complete the sentiment I added "With you" on the inside of the card.

If you want a detailed video of making such shadow box card hop on to Jeniffer Mcguires you tube channel.

You can make many such shadow boxd cards using expraftessions craft stamps and your imagination....

I would like to share few more pics of my card....


If u loved to read my post please leave some love in comments below.


Bye...


As I have made this card keeping in mind thisd months Parus card making challenge....where the theme is Masculine card.

I would like to enter my card for HERE