Saturday, 30 June 2018

Wonderful birthday wishes with checkered florals

Hi Friends,

I just came to know about a new blog challenge by some super talented crafty friends and was eager to participate.

As I am running out of time because today is last day to participate, I won't write a long post.

Have a look at what I tried for "checkered floral" the Theme of this months "the twised challenge"challenge. 


I have made the checkered background on a plane watercolour paper using a chevron stencil from MFT. This checkered background I had alreday made for a card and out of the left paper I made the flowers. Stamped the floral image as well as leaves with archival jet black ink and fussy cut the images.
As u can see I have created a frame window in the middle of the card and used a embossed border to give it an enhanced look.
adhered the floral and leaves in the middle and stamped the sentiment in the middle of inside of the card.
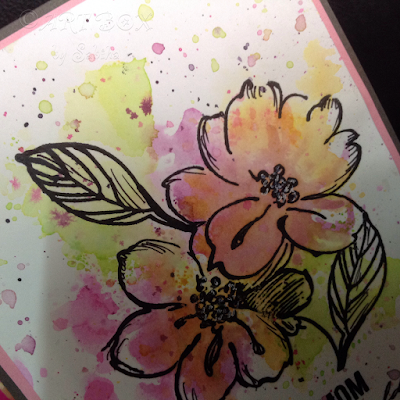
Finally I added some glitter with wink of stella pen on flowers. It is clearly visible in my close up images.

Few more close ups ....


Hope u like my attempt...

Love,

The link to the twisted challenge is HERE

Also entering my card for Less is more challenge (I have used left over bits of checkered paper for flowers)

Play along HERE


And, also entering my card for AAAcards challenge( used a frame)

Play along HERE


Wednesday, 13 June 2018

Shadow box card


Hi friends,

Hope you all are enjoying crafting.


I am Sabiha again this week with my new inspiration post, Its a SHADOW BOX CARD..... made using Expressions crafts beautiful "HOT AIR BALLOON STAMP SET"

When I recently saw a shadow box card video by talented crafter "Jennifer Mcguire" I was sure that I am going to make one such card and the very next thought was stamp set by Expressions craft.
I would like to add here that I got equally inspired by Paru Mahtani who shared so many lovely shadow box cards on IG.This card is also a Masuline card made for Fathers day.

This stamp set was just perfect to make this card and I am proud to use such best quality Indian brand stamps...

Lets first have a look at my card ....


Hope u all guys like my card and now it must be clear how a shadow box card looks.

I stamped few balloon and cloud images from the stamp set on a smooth water colour card stock coloured and fussy cut them.
Took a 8 1/2 by 11 1/2 card stock for the card. Cut two pieces to make 5 1/4 by 8 1/2 size two card stocks. One serves the base card and another for the box.
I took one extra card stock little smaller than the inner half to make the skyline background.
For the front cover I made clouds using a hand cut stencil from acetate sheet and adhered the Balloon and clouds to make a scene.
Added the sentiment using archival black ink.
For the inner box card I made the box, adhered it to the card and before that adhered the background skyline stencilled image to give the depth to the card.
As you can see I have adhered the coloured balloons on the box as well as inside the card.
The scene was ready in no time and it looks so beautiful.
As I wanted to complete the sentiment I added "With you" on the inside of the card.

If you want a detailed video of making such shadow box card hop on to Jeniffer Mcguires you tube channel.

You can make many such shadow boxd cards using expraftessions craft stamps and your imagination....

I would like to share few more pics of my card....


If u loved to read my post please leave some love in comments below.


Bye...


As I have made this card keeping in mind thisd months Parus card making challenge....where the theme is Masculine card.

I would like to enter my card for HERE


Friday, 25 May 2018

Mom - you are my queen

Hi guys,

I am back with one more post on mothers day card...

Though I am late but happy that I could make something meaningful. A card which conveys my best feelings for my MOM.

I think every Girls Queen is her MOM.

First my card....


Some close ups too


For this card I have used white card base. Applied distress oxides with Tim holtz rays stencil. Stamped the bird image from again Tim Holtz clear stamps set and coloured it with zig markers.

I have used two die cuts for M letter and coloured using distress inks. Adhered all the three to make MOM word on my card. It looked adorable. 

As I wanted the sentiment to be "You are my Queen" , took a Craftert companion die with Downtown Abbey icons. Cut a crown from the die set and embellished it with pearls and Rhine stones.

Finally placed the crown on birds head and yeh.... My card is ready.

The sentiment is hand written on black card base with white gel pen.

Hope u guys enjoyed my post and Thanks you for visiting.

do leave some love in comments

love.....


Entering my card for 

1. Parus card making challenge

Click here to play along


Best mom in the world

Hi friends,

I am back with two lovely floral cards for mothers day..

I feel mothers are very special person in every ones life.So gifting a lovely card to her can be anytime , I don't need a mothers day to gift her a lovely card.

As my mother loves flowers I have made these two cards from hibiscus stamp set from Altnew.

My cards...


and the next card is 


Hope u like my cards ...

for the first cards I did heat embossing on vellum and made the flower with three layers of vellum.

for the second card I stamped the images with archieval ink and them did paper smooching technique for the colours.

entering both my cards in Parus card making challenge

click here to play along

I am also playing aaacardschallenge


love 


Mothers Day cards

Hi friends, 

I am back after a while and also late for my mothers day cards..

But its better late than never.
Recently I bought some stamps in destash from my very sweet friend Neha. Along with the goddies she gifted me few dies and stamps which I could use in my mothers day cards.

I have used Mudra stamps for the leafy background and Hero hoot stamp set for the image and sentiment.


here is my card...and few close ups too


Hope u all like my card ...

entering this card in following challenges

Parus card making challenge...

click here to play along 

love..


Tuesday, 24 April 2018

FLORAL GIFT TAGS


Hello Friends,

Hi, Hope u all are busy with your creations.

We always need tags for our gifts so lets first see the simple yet attractive tags I made using floral stamp set "wild flower". 


And another one....


For both these tags I have used same technique that is  paper smooching technique....
Took a water colour card stock and die cut it with rectangular die...it measures 3.5 inches by 2 inches. For the tags this size is almost perfect. I had smooched the card stock with two different shade of red for the first tag and with two different shade of blue for the second tag.I have used Gansai tambi watercolours.
After the colours dried added some splatters of colour with water brush to give more interest to the tags.
As we use tags on gifts, I love to add a plane die cut ( used Expressions craft plane card stock) of same size on the back of each tag , this gives a good finished look plus some space for personalised message on the tags. I stamped the floral image on a plain white card stock with archival ink fussy cut it and adhered it on the prepared tag. Attached both the die cuts with the help of a jute twine of coordinating colour

My third tag is a bit different have a look...


I made the base with the same technique of smooching and then stamped the floral image using darker coloured distress inks on the paper, added the sentiment with archival ink. 

Hope u all like the tags and use this simple technique to make them  and beautify your gifts.

Supplies List

If you like my post leave some love in the comments below...

Love.

Happy crafting friends.

I am playing along following challenges....
1. Parus card making challenge for the month of April


Sunday, 1 April 2018

DECOUPAGE TRAY AND COASTERS
Hi Friends

Till now I have only posted cards making on my blog, But my passion always was many more crafty things like decoupage, scrapbooking,making things from felt, embroidery, crochet and knitting and stitching too.

And today I am sharing one of the crafts with u and that is Decoupage....

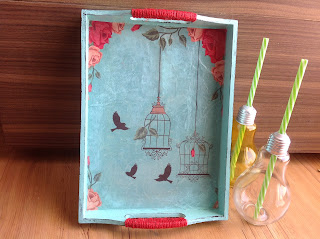
I have made deoupage trays and coasters from beautiful Expressions crafts decoupage papers. 

Have a look at my creation first and then i will explain u how i made this.

These lovely coasters along with the tray are made from decoupage papers from Expressions crafts.

First take the mdf base which is to be decorated. Apply white gesso all over the surface and let it dry. Now, make it smooth by rubbing the surface with fine quality sand paper. Clean the surface with a damp cloth. Apply a good coordinating colour (chalk paints) or a contrast colour(chalk paint)  what ever u like to the base and let it dry.

Now your base is ready to be decoupaged. 
Take the decoupage paper measure and cut according to the required size for the tray, and for the coasters cut it little larger than the size.

Take a sponge applicator and glue the surface. Stick the paper by rubbing with your fingers and thumb on the glued area.Apply the glue very little at a time to cover small areas  so that you get a fine finish and good results.Take care that no air remains beneath the paper.For the coasters after the paper is properly stuck on the mdf surface take sandpaper and rub the edges to take off the excess paper.
Let the tray and coasters dry properly and then apply two coates of glue ove the paper to give a good finish.Take care to dry each time you apply the glue.
Finally for giving some distressed look I have applied little black paint on the edges of the tray and coasters using just fingers.
Added a jute twine around the tray handles to make it lool more beautiful....
Yeah......it is read. But to make it water proof apply one or two layer of varnish to give it a shiny look and a good finish.

Now its read to use...

Guys....I have a video tutorial too for this process .....
Have a look at more pics and the video...


Hope u all like my project....

Love....