Sunday 8 October 2017

CAS birthday card

Hi dear friends,

Hope u all r doing fine.

I was so much inspired by Erum Tasleem's card that i decided to case it. Let's have a look at Erum's beautiful card.

https://scontent-bom1-1.xx.fbcdn.net/v/t1.0-9/22228302_10155396816986077_2240876424770402168_n.jpg?oh=3fe0d20f87c8354417664ad837e01f57&oe=5A83FF51
 now, have a look at my card which is totally inspired by this beautiful card.
I made my card with minimum colours n lots of white spaece.


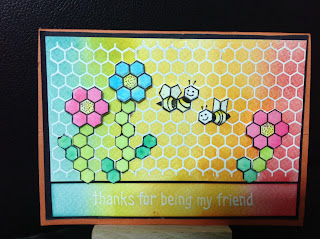
This is a clean n simple card. I have used MFT "one way chevron" stencil to make the grid pattern on a white smooth watercolour paper. Sprayed water on the pattern to give a different look, then I took a circular die to cut the partial circle. I have used Tim Holtz's celebration dies for the sentiment. To give dimension to the sentiment I have used three layers of paper n also used black paper in the middle. After using inlay technique I have also applied Glossy ascent for the shine on the sentiment.

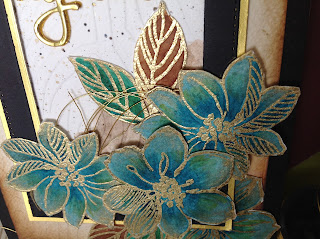
lastly took white card stock and stamped butterfly and flowers from the Altnew Bamboo rose stamp set.
Fussy cut n adhered them with two way tape. I have also used half beads to embellish my card.

Hope u all like this card.


I am entering my card in the following challenges 
1. casology challenge #269  GRID
to play along click here

2.casethissketch #242 challenge
to play along click here

3.caseing#13 on Sovushka slavia's blog
to play click here


Hope u all enjoyed reading my blog. Thank u so much for taking time n visiting my blog. HUGS......

Friday 29 September 2017

write ur own story


My mixed media canvas


Hi dear friends n all the lovely crafters.

It was my long time dream  to make some mixed media layout. When i saw the mood board for this months Rainbowcraftykari challenge I was somewhere sure in my mind that I will try mixed media.

Guys, I am sharing few pics of my creation......


Hope u all like my creation. I have used tropical colours n feathers chipboards from papericious for this project. I have also used few corrogated sheet other chipboards to make the ink pot and nib.

Here I strongly believe in the sentiment "WRITE UR OWN STORY". When we do some work with dedication and love, we can write our own story. As education is the base for everything good happening in the world, I have used the ancient style of writing where people used ink n nibs attached to feathers for writing.

I first took a 6" by 8" canvas n then applied white papericious gesso on it. Took all the chipboards n applied gesso on them too. Took some corrogated sheet with two different patterns and adhered them on the canvas.Applied texture paste on the canvas to make the brick pattern. Used acrylic sprays n acrylic colours for the project. Added some pearl silver for a shine . Adhered all the coloured chipboards and a twine at the bottom to give more enhanced look.

I had made this paper rose some time back, which beautifully got incorporated in my project.

I am linking my this artwork with the following on going chellange.......

1. Rainbowcraftykari challenge #5 - mood board


chick    here  to play along.

2. Papericious monthly challenge - incorporate chipboards.


click   here   to play along.


Bye for now.
See u soon guys with some
 new projects. Hope u enjoyed reading.


Thursday 28 September 2017

U R Precious card 


Hi dear crafty friends,
I am back after few days as i was busy with some other commitments.
Hope u all r fine n busy with the festive season. 

Today i have come up with the lovely pestle card for Altnew,s inspiration challenge
 for the month of September.

Here is this beautiful inspiration pic by Sveta .......
 
 click   here   to play this challenge

 This beautiful image inspired me to create this card .....


Hope u all like my creation.
I have used bamboo roses stamp set from altnew for the beautiful flowers and Remember this stamp set from altnew for the sentiment.I have taken pastel colours for the background which is heat embossed with white EP. Used a white die cut for the sentiment. Adhered the final card on a pastel green card stock and then finally on a Gray front folding card.

hope to u see u all with more such creations.

LOVE Sabiha


Monday 28 August 2017

Bud-Day card

Hi,
Dear crafty friends.
Hope u all r enjoying crafting as much as I do.
Today I am sharing a quick and simple birthday card for a friend.
Most of the time we call our best friends as Buddy, yes this is what i have depicted in my card.

it says" Happy Bud-day Buddy."

My Card, hope u all like it.

The inside look of the card. I preffered to write the sentiment to give it a personal touch.
 

I have used kraft coloured cardstock for the base which i have dry embossed to give it a woodgrain texture.
I took vellum sheet n heat embossed the bud image from  "Altnew striped floral stamp set" with white EP.
Adhered it on a white card base n adhered the prepared rectangular card on the main card. I added a white and kraft twine for some added interest.
Have a close look of my card,


Hope u all like it.


Entering my card in the following challenges
1. Casology challenge #263
click HERE to play.
2. Casual friday colour challenge #181
click HERE to play


Sunday 20 August 2017

CAS Pricky patchup card

Hello,
Dear crafty friend.
 Today  I have sharing a very clean n simple card. It does not need any stamps or colours, rather it is made using felt n thread on a cardstock.

You all must be wondering how my card looks, so have a look of my card first then I will tell u how I made it.


A close look..........


I have made this card for this weeks CAS ology challenge, thats "Prickly".
I took a plain white cardstock for the base. Took two felt pieces, one red n another pink. Cut two hearts of different sizes with metal dies. Took a red thread and made patch on the red heart using button hole stich. As the theme is prickly i used the needle in the card to prick the heart. 
Finally adhered the felt hearts n few coloured pattern paper to finish off my card.
Lastly the sentiment , which says the whole feeling behind the card.
It says " Lets patch up. It pricks."
This card is also made according to the given Sketch for CAS(E) the sketch challeng #235 
I am linking this card to this challenge too. 

The sketch is:


Have a great day. Thanks for reading my post. Hope u enjoyed.

SABIHA


Linking my card to following challenges

1. CAS ology challenge

2. Parus cardmaking August challenge

3. CAS(E) this sketch challenge#235


Thursday 17 August 2017

Friends forever

Hello ,
All dear crafty friends.

When u think of friends, the first thing that comes to 
your mind is your childhood  memories, that was the time we have spent maximum with our friends. I used to go cycling with my friends. We used to have lots of fun n those r the days i can never forget.

As this card is made remembering my chilhood memories, i have included a bicycle die cut in my card.
I have coloured this with rainbow colours as those were the most colourful years of my life.
Friends what do u say.......R u also thinking about your colourful childhood days?

Have a look at my colourful card.


I have used water colour cardstock for this card. Heat embossed the pattern with clear EP. Colourd it with rainbow colours using smooching technique. Took the same card stock n die cutted a bicycle from it too.. adhered the diecut on the plane brown cardstock. Took another watercolour card stock n used sencil to get the desired pattern with different distress inks. Finally embossed the sentiment "friends forever" with white EP and fussy cut it. Arranged all the three cardstock on a red base cardstock. 

Hope u all like my card. 
Thank u.
SABIHA

linking my card to following challenges.

1. Parus card making challenge : august month "Anything goes" click on the link below to participate in this challenge.
click HERE to play this challenge.

2. RainbowKraftikary august month challenge.
click  HERE to play this challenge.


3. Your next stamp challenge.
click on the link below to play this challenge
link to YNS colour n sketch challenge

4.CAS-UAL Fridays callenge
click HERE to play this challenge


Sunday 13 August 2017

Floral card with gold touch

Hi lovely crafter n friends,

Today i am here with my card for Altnew's current challenge.
Yes, u r right. Its the challenge for month of August given by the most talented and lovely crafter Erum Tasleem.

 Here is the inspiration pic given by her.


 Click  Here  to play along this challenge. 
This lovely and colourful card by Erum inspired me so much that i could not resist making a card.

Few pics of my card which I would like to share with u.


I used Altnew's "Wild Hibbiscus" stamp set to gold emboss the beautiful flowers on a watercolour paper. 
Coloured them with Ghansai tambi water colours n fussy cut the images. Did the same with the leaves too. 
Took a watercolour card base for the card and dry embossed it with woodgrain embossing folder. 
Used "Gathered twigs" distress inks to distress the edges of the card base.
Took a black  and a gold card stock to cut the frames using frame dies. 
Adhered the frame using twoway tape to give a raised look.
Arranged the flowers n leaves on the card n for some bling I used some gold embroidery thread.
I have used Sizzix thinlet dies for the sentiment "Congrats" n used a foam die cut to give it a raised look.
Finally took a Black card base and adhered the prepard card on it to finish off my card.

Hope u all like my card.
Thank u for giving some time to visit my blog. Leave some love if u like it.

SABIHA

Friday 28 July 2017

Rainbow friendship card


Rainbow friendship card 

using hexagons.

Hi friends,
Today I am very happy to share this card with u all. 
As Rakshan bandhan n Friendship day are approaching i made a friendship card for this challenge.
Hope u all would love it.


 Guys, i am in love with this card.  
I took a watercolour cardstock. Stamped the hexagonal pattern with Ranger white embossing powder. I used Mudra hexagon mini stamp set for this pattern. Coloured the background using distress inks and yeh, see how beautiful the rainbow coloured background looks.
I took another cardstock and stamped the same pattern with archieval jet black ink.Coloured the floral pattern and the bees from the stamped cardstock. Fussy cut the flowers n bees n adhered them on the card with two way tape n glue. 
Finally stamped the sentiment on a stip of  cardstock n colourd n adhered it too with the prepared card on a black top folding card.

I am entering my card to following challenges
1.  Milk's I love maths challenge.
Hop on to this link below to play along,

2. Rainbowcraftykari August month challenge


hope u all like my card.
Bye......                                                                                                                               SABIHA

Thursday 4 May 2017

2nd card for #i love maths challenge#5

Hi friends,
Hope u all r doing well.
I am happy to be hear with my 2nd entry for crafty milka's #i love maths challenge.
Hope u all like my card.
Here I have made a scene using different shapes like triangles, clouds n circle.
As the challenge is to use VENN diagram in the card , I have made two type of Venn diagrams.
Hope u all like my card n the sentiment.
I have used embossing folder to give dimension to the background n used distress inks to colour it.
For the elements I have used zig water brush marker pens. U can see the mixed colour effect where the two shapes overlap.
If u like my card please leave ur love and  comments below.
It means a lot.Bye.

Go to this link below play this challenge.....

1Link to milka's blog

Sunday 16 April 2017

Humming bird card

Hi friends,

Hope u all r doing fine. I am here again to share with u all my " humming bird card"
I have used Mudra craft stamp sets " Humming bird" for the images n " Love" stamp set for the sentiment. Ya for the little stars in the background I used " Party" stamp set too.

Have a look at my card and then if u like it u can read the steps to make it and learn.


Hope u all r ready to learn this beautiful card.

1. Took a water colour CS for base.
2. Cut a circle out of masking paper n adhere it in the middle of the card.
3. Now ink the humming bird stamp sets floral stamp with archival black ink pad but take care to ink only the parts u want to stamp on the card.
4.Go around stamping the flowers ,leaves n buds around the circle but take care to mask the rest of the stamp with masking tape so that no extra images r stamped.
5. After stamping floral background I stamped the two bird images using "gathered twigs" distress inks. I stamped the stars with distress inks too.
6. Used zig markers to colour the floral background.
7. Coloured the birds n stars with distress inks too.
8. Removed the circular mask in masked rest of the card again with the negative mask which was left after cutting the circular mask.
9. After masking used "spiced marmalade" distress inks to colour the circle.
10. Now the card is ready , for the sentiment heat embossed it with gold EP on a brown CS.
11.Adhered the sentiment in the middle using two way tapes to give it raised look.
12. Finally I used glossy ascent on the stars to make them shine. 
 My card is ready to be adhered on a card stock. Here I have used green CS.
Hope u all like my post n love to read.
Please leave ur comments below .
If u have any queries u can ask me I will try to reply asap.
Good bye n leave some love.
Ur comments n love r precious to me.


Sunday 9 April 2017

l love math #5 challenge

CARD MADE USING "VENN DIAGRAM"


Hi friends ,
I am here again to share with u fun technique as well as a card made using " venn diagram" 
Hope u all know what is venn Diagram? Well to explain u in short it's a diagram made with two intersecting shapes. Where the common portion has the properties of both. 
Well this is the theme fr this months ' I love math' challenge by Very talented crafty Milka
To play this challenge the link to the blog is..Here

I tried my hand on making a card using Venn diagram. 
Have a look,

Hope u all like my take n now I would like to show u how I made this.

1. I took a Brusto watercolour card stock for the base n masked it with washi tape just leaving a window in the middle.
2. I took a sentiment from Mudra craft stamps "love" stamp set n made the background by stamping it   
with three different moments inks.
3. Took vellum n heat embossed the hearts with white EP. 
4. Coloured the hearts from the back side n fussy cut then.
5. Adhered the hearts in such a way that they overlap each other, here is the ven diagram made n the colour gets combined to give a new colour. 
6. Now use distress inks spun sugar to distress the background where the stamping is done and used picked raspberry to distress the edges.
7. Heat embossed the sentiment from the same stamp set n adhered it on the bottom of the card. 
8. Yes one more thing, the hearts r actually balloon shaped so took twines n made the strings too. 

Ta..da... The card is ready. If u have any questions u can surely ask me n yes if u like my post then like it n leave some love.

Thank u guys.
One more closeup of my card


Ho

Friday 24 March 2017

Simple birthday card.

Hi dear friends,
Hope u all r doing fine.
I have a beautiful n very simple birthday card to share with u all.
Have a look at my card.


I have used a 4.5" by 6" card stock fr the base.
I have used three basic colours to make my card. Red blue and yellow. 
For the gift boxes I used the three colored card stocks in different.
Made different patterns with using my score board n coloured in between the scored line with using gel pens.
Hope u all could understand how I made the boxes. 
Adhered them on the card stock with using two way tapes to give it some dimension.
Then I pearsed two hole one on the top middle part and another on the bottom middle part of each box. 
Now u have six holes in total. Take a matching twine n used needle to sew it through the upper hole first n then take it out from the bottom hole in the card stock. Now u have two ends on the from of the card stock. Make a bow on top of each gift box n then cut the extra twine.
Do the same with other boxes too.
I have heat embossed the sentiment " wishing u Happy birthday" with Ranger white embossing powder.
Took some star stamps to stamp the background n color few with the same three colours. 
Did a stitched outline with black marker pen.

Yeah..... My card is ready to be adhered .
For the base card I took a black card stock n made diagonal lines with white Fabre castle pencil colours.
Coloured alternate lines n I got the desired pattern.
Adhere ur prepared card on the base n yes ur card is ready.
It's so simple.
Guys, hope u enjoyed my blog n it was easy fr u all to understand. U can make ur own creation with these type of cards by taking different type of paper fr the boxes .
Just fly high with ur imagination and u will create wonders.
Bye....... See u soon.

Tuesday 28 February 2017

Cards for friends.

Hi everyone,
I am here with my first blogpost.

Hope u all will like the cards I made.

It's spring season I just wanted to give my friends some hand made cards, so I made these floral cards with a happy spring sentiment.

Just have a look at my finished card.


I would like to explain how I made this card step by step. 
1. Took a 4.5" by 5.5" watercolour card stock.
2. Colours both the opposite edges with distress ink.
3. Took a smooth watercolour card stock n stamped the flower image n leaf image with gold embossing powder. I stamped first with versamark clear sticky ink then heat embossed it with gold.
4. Colours all the images with zig clean clear brush marker pens n fussy cut the,.
5. Took a two way tape n adhered them on the prepared card.
6. In a corner I stamped the sentiment with archival ink jet black.
7. Lastly adhered the card on another plane blue card stock n put them in matching colored envelops.


These r step by step images fr reference.


Hope u all liked my cards. If u like these please leave ur precious comments n love. 
Bye. Will soon return back with new cards n techniques.