Hi Friends
Till now I have only posted cards making on my blog, But my passion always was many more crafty things like decoupage, scrapbooking,making things from felt, embroidery, crochet and knitting and stitching too.
And today I am sharing one of the crafts with u and that is Decoupage....
I have made deoupage trays and coasters from beautiful Expressions crafts decoupage papers.
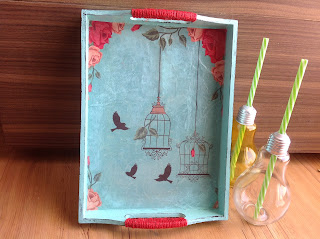
Have a look at my creation first and then i will explain u how i made this.


Till now I have only posted cards making on my blog, But my passion always was many more crafty things like decoupage, scrapbooking,making things from felt, embroidery, crochet and knitting and stitching too.
And today I am sharing one of the crafts with u and that is Decoupage....
I have made deoupage trays and coasters from beautiful Expressions crafts decoupage papers.
Have a look at my creation first and then i will explain u how i made this.
These lovely coasters along with the tray are made from decoupage papers from Expressions crafts.
First take the mdf base which is to be decorated. Apply white gesso all over the surface and let it dry. Now, make it smooth by rubbing the surface with fine quality sand paper. Clean the surface with a damp cloth. Apply a good coordinating colour (chalk paints) or a contrast colour(chalk paint) what ever u like to the base and let it dry.
Now your base is ready to be decoupaged.
Take the decoupage paper measure and cut according to the required size for the tray, and for the coasters cut it little larger than the size.
Take a sponge applicator and glue the surface. Stick the paper by rubbing with your fingers and thumb on the glued area.Apply the glue very little at a time to cover small areas so that you get a fine finish and good results.Take care that no air remains beneath the paper.For the coasters after the paper is properly stuck on the mdf surface take sandpaper and rub the edges to take off the excess paper.
Let the tray and coasters dry properly and then apply two coates of glue ove the paper to give a good finish.Take care to dry each time you apply the glue.
Finally for giving some distressed look I have applied little black paint on the edges of the tray and coasters using just fingers.
Added a jute twine around the tray handles to make it lool more beautiful....
Yeah......it is read. But to make it water proof apply one or two layer of varnish to give it a shiny look and a good finish.
Now its read to use...
Guys....I have a video tutorial too for this process .....
Have a look at more pics and the video...
Hope u all like my project....
Love....

No comments:
Post a Comment