Saturday 31 March 2018

Colourful stenciled card

Hi crafty friends,

Today I have come up with card which I had made just as an experiment to see how the image comes out when the inner lining of a stencil is traced with a black micro pen.
And I was amazed at the results.
First have a look at my card ..... 


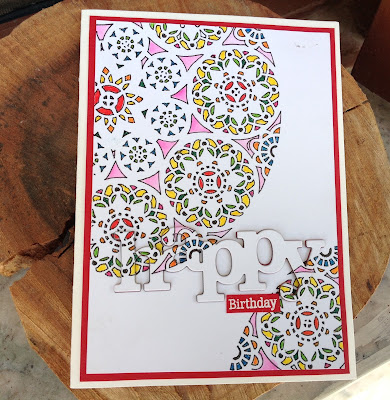
I used a plain white watercolour card base and used expressions crafts doily lace stencil for the image. After tracing with micron pen I coloured the image with Zig markers in rainbow colours. This gave me these beautiful colourful image. 

As I didn't want to spoil the beautiful lace design I just used a "HAPPY" die from Winnie&Walter to cut the sentiment from the card. I also made different rainbow coloured die cuts from the same die. staked them up and adhered beneath the first die cut. 

Finished off my card with a birthday sentiment embossed on a red card stock and adhered the card on a red card base too.

Its a simple yet beautiful rainbow colours card. Loved the results and found an unsual way of using a stencil.


Few more closeups of my card....


Hope u guys like it.
Share your precious comments below and leave some love.

love,


1.I am entering my card in Paru's card making challenge 


     click HERE to play along.

2. I am also entering my card for Winnie&Walter colour combo challenge for this month.
click  HERE to play along
The  lovely bright and colourful inspiration image by Heather H. for this month is

Floral spring card

Hi everyone, 


It was my daughters birthday on 29th march and I made this beautiful card for her. I did not want to write a simple birthday message but something different for her card, so I chose to write "U R Precious" on the card and "Gift from God" for the inside of the card.


It came out so so elegant and pretty that I just fall in love with my card. Have a look at my card first......


I am sure u all will be happy to see this beauty..


I made this card using a smooth watercolour paper. Heat embossed the images of flowers, leaves and buds from Altnew "Striped floral" stamp set with white embossing powder.


Coloured the flowers and leaves with Ghansai watercolours which gave me such beautiful results. Fussy cut the images and adhered them on my card base which I had splattered with some blue and black inks. Also I had distressed the card base with some "Broken china" distress inks.


Finally heat embossed the sentiment on a black card base with white embossing powder.Adhered the sentiment with two way tapes to give a raised look.


She was  happy to receive this card on her birthday.


I would like to share some closeups too.


Hope u all like my card.

Leave ur precious comments below as they mean a lot to me.
Love.....

I am entering my card in the following Challenges...

1. Altnew inspiration challenge for the month of March.
This beautiful image inspired me to play along..


If u want to play click HERE to play along.


As my card has floral design, I would love to play these challenges too.
2. Stamploration Sping and Faith march challenge
click HERE to play along.


Tuesday 27 March 2018

Inspirational card - Create Draw and Paint

Hi all crafty friends,
Hope u all are busy creating new things each day.

Here I am back with a new card specially designed to inspire u all to colour. Colours are my best companions. Can u think how dull our life would be without colours?

I thank Almighty for giving us a colourful world to live in.
I have created a very simple but colourful card. 

Have a look.....


Some close ups too.....


I have taken a watercolour card base for my card. I used a Julie Nutting planner Stamps from Prima Marketing for the Splotch and the small images of pencil brush and palette. I used the sentiment from the  same stamp set.
Used distress inks in rainbow colours for stamping and jet black Archival ink too.
Loved the simple but a meaningful outcome. 
Hope u all like it.
Keep on creating and sharing......
1.I am entering my card for Parus cardmaking challenge as this months theme is depicting the word COLOUR
click HERE To play along.


2. I am playing AAAcards CAS game #111, as this weeks challenge is use only 1/3rd of the card.
click HERE to play along.


Love 


Saturday 24 March 2018

Welcome card for a baby girl

Hi friends,


I am back with my DT post with cuteness overloaded.
It's a card to welcome a new born baby girl. 
As we all know that colour for a cute little baby girl is aways pink, so my today's card is all pinkie pinkie. I have used Expresssionscraft stamps "Shopping for my baby" stamp set to make this card.
First have a look at my card.....


Lets now learn how I made this card.
Firstly I selected all the stamps I wanted to use in my card.
I stamped n coloured them with my Zig marker pens and gel pen.


After colouring the images fussy cut them and kept them aside. Took a white water colour paper for the base card of size 4.25" by 5.5". Made the clouds using stencil and distress inks. I also made the grass with a die cut.After the background was ready, I made a cute baby laundry line with all the images I had coloured, adhered them using two way tapes to give them a raised look. I also used a pink twine to make the laundry wire. Placed the baby horse toy image on the grass.
Thus I finished my card with a welcome sentiment from my stash and "Baby!" and "It's a girl" sentiments from the same stamp set from Expressions craft

Few more close ups of my card.


I finally Adhered my card base on a blue card stock of a slightly bigger size n then finished off with a front opening pink card base.
Hope u all loved to read my post and loved my card too.

You can buy this stamp from our store by clicking the below link.


When I saw this weeks cupcake inspiration challenge..... I deided to enter my card for it.
Here is the inspiration for cupcake challenge...

to play along this challenge hop on to the link below

Love


Layout for a Baby Boy using Expressions stamps

Hello dear friends,

Today on this Expressions Craft blog I am sharing a cute n lovely layout for baby boy pictures.

It was Women's  Day on 8th March. A women is always a loving mother at heart and she never wants to forget her little ones baby days. In today's project I am making this layout for little baby boy pictures to cherish the memories forever.

When I received all the stamps from Expressions craft , I was sure I may use all of them in my single project. As all these stamps complement each other. The three stamp sets I have used are "Hot air Balloons", "Shopping for my baby" and "Oh my Baby". I have also used Wooden rectangular decorative frames from Experssions too.

I am going to share pictures  as well as a video to show how I made this lovely layout.
Yes, a video too. I am equally exited to share this with u all.

I would like to share some pictures first, and then a video with explanation.


Few close ups too.....


Guys, hope u all like this cute layout. It is truly easy to make this using "Expressions craft
 stamps" and "Wooden rectangular decorative frames".

I will show u how.
First I will show u few basic things to prepare for the layout. U will need a 12" by 12" pattern paper for the base. To make it sturdy u can stick it on a chipboard. It is optional. I took all the stamps which I wanted to include in my layout. Stamped the images using Archieval jet black ink on a smooth water colour paper. The results were too crisp and fine. I was too happy with the results.Coloured all the images with water colour. Took both the wooden frames and coloured them using sky blue chalk paints. Took some pattern paper and cut it into few stripes for decoration. Made Rossetti's out of paper too. I have also used few  stars and a "baby" die cut .And off course the pictures of baby. Cut the pictures accordingly to fit properly inside the frames.
It was too easy to assemble all the images and pictures to make this beautiful layout.

Lets see how, in this video.


Friends, Hope u all will be able to try this simple and beautiful layout using Expressions craft stamp sets and Wooden rectangular decorative frames. 

You can buy the supplies used in this project from our store by clicking the below link


Bye friends. Leave some love and comments below if u like my post. N do try this out.
Hope to see u all soon with my new creations.

Love Sabiha.

Friday 9 March 2018

New release for the month of MARCH


Hello friends,


It's that time again for the New launch at Expressions Crafts. 

This month we have some truly amazing products in store for you - Stamps, Decoupage papers, and Stencils.

All these products are available in our store 

Here is the sneak peak


Here is the chance to win one new products out the new release

1.Be a follower at Expressions Blog and leave a comment!
2. Follow us on Facebook and share about release with your friends!  


Join us the fun


LOVE Sabiha

Saturday 3 March 2018

Doily Lace Stencil cards


Hello crafty friend,

Wish u all a Happy Holi and happy weekend too.

This is my first post for Expressions craft DT, hope u all like my cards.
I have used beautiful " Doily Lace Stencil" from "Expressions craft stamps" in all possible ways to show the versatility of this stencil.I also wanted to show u how we can make different backgrounds using different techniques.
Lets start with my very first card, Its a holi card.


For this card I have used a watercolour card stock of size 5" by 7". Placed the stencil partially on the card and ink blended distress inks to give the rainbow effect. Took another card stock to die cut "HOLI"alphabets and coloured them with bright water colours. I also used die cut for "Happy" to complete my sentiment.
Adhered the ready card on a red colour card stock and finished it with white card base.
U can always try different colour combos for such cards.

My next card is....
  

For this card I took a red coloured card base and used Hero Arts" White pigment ink" to give this beautiful look to my card. Take care to use sponge daubers for inking through the stencil. After inking this ink takes some time to dry , so be careful too. I have die cut the sentiment n used some red and white twine and few pearls to beautify my card. U can always try different dark coloured cardbase for such cards.

Third card using the Doliy Lace stencil.....
 

This congratulations card is too simple but equally beautiful.
For this card I have used craft card stock for base and applied texture paste through the intricate Doily Lace stencil. After the texture paste dries the card is ready. I used a die cut for sentiment and a burlap flower to enhance the beauty of my card. Adhered some diecut leaves and few water drops here and there. Took a dark brown card base to finish my card.
Guys hope u all are enjoying my post.....

I have made a square note card for my Fourth card.


For this card I have taken 4" by 4" watercolour card base. First I applied texture paste through my stencil and then let it dry properly. After the paper dries I added different colour splashes of distress inks here and there. Then sprayed water over the card and let all the colours get blended to give this beautiful natural look. Dried the card with heatgun. Adhered the heat embossed sentiment "HUGS" and added few sequins . Took a pink and white card base to finish off the card.

I tried few more techniques to use this beautiful Doily lace stencil which I would like to share with u.

Have a look at these two gift tags.....

I applied texture paste and while it was wet, sprinkled  "Enchanted gold" embossing powder from Ranger. Let it dry first and then heat emboss it. U can see the beautiful effect on the brown tag with glittered embossed pattern.
Next, I applied Versamark ink through the Stencil and heat embossed it with Ranger Gold embossing powder. U can see the Green paper with gold pattern on the tag.
For both the tags I die cut the circle pattern with round die.Same technique can be used to make beautiful background for cards too.
Hope my post is worth reading and u all had a nice time.

This stencil can be purchased from our store at the below link
https://www.expressionscraft.in/shop/doily-lace-mixed-media-stencils/ 
Looking forward to meet u all soon with my next post.
love, Sabiha.